
Tool Barの実装方法を紹介します。
目次
Tool Barとは
Action Bar(Tool Barの前身)
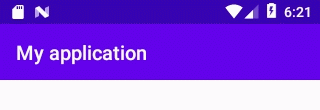
Action Barはコンテンツの上部に表示される帯の部分です。
デフォルトのテーマにより表示するように設定がされています。

基本は左側に「タイトル」、右側に「オーバーフローメニュー(メニューを開くアイコン)」が表示されます。
Action ;Barはアプリケーションの見た目と操作性の統一を目的にしたものです。統一されていれば「利用者はどのアプリを使う場合でも迷うことなく操作ができる」というわけです。
ただし強制ではないので、世の中に出回っているアプリを見ると、Action Barの無いアプリもあります。
アプリの作り手から見れば、限られた画面の一部を占有しているAction Barを削除して、より多くの情報を利用者へ提供したいと考える場合もあるのでしょう!
このAction BarはAPIレベルが上がる毎に変更と機能追加が行われてきました。従って、APIレベルが異なると動作の違う場合があります。
その中で最も大きな変更が、「≧Api21」で行われたマテリアルデザインの対応です。「<Api21」のAction Barはマテリアルデザインの見た目と操作性を味わえません。
Tool Bar
Tool BarはAction Barを代替するものとして「≧Api21」で登場しました。
Tool BarはAndroidXライブラリ(旧サポートライブラリ)で提供されています。
Tool Barを用いればAction Barで発生していたAPI間の見た目と操作性の違いを無くし、常にすべてのApiで最新の機能が使えるようになります。
なので、GoogleはAction Barを使うよりもTool Barを使うことを推奨しています。
※Androidドキュメントに書かれていたと思いますが、見つかりませんでした。
ただし、Action Barはデフォルトのテーマにより実装(自動で付加される)されますが、Tool Barはプログラム中に実装を記述(手動で付加する)しなければなりません。
Tool Barの実装
先にも書きましたが、Tool Barはプログラム中に実装を記述する必要があります。
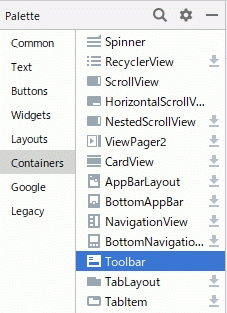
Toolbarウィジェットの配置
Android Studio(Arctic Fox|2020.3.1)のレイアウトエディターを使ってToolbarをレイアウト上に配置します。
<?xml version="1.0" encoding="utf-8"?>
<androidx.constraintlayout.widget.ConstraintLayout
    ...
    tools:context=".MainActivity">

    <androidx.appcompat.widget.Toolbar
        android:id="@+id/toolbar"
        android:layout_width="match_parent"
        android:layout_height="wrap_content"
        android:background="?attr/colorPrimary"
        android:minHeight="?attr/actionBarSize"
        android:theme="?attr/actionBarTheme"
        app:layout_constraintBottom_toBottomOf="parent"
        app:layout_constraintEnd_toEndOf="parent"
        app:layout_constraintStart_toStartOf="parent"
        app:layout_constraintTop_toTopOf="parent"
        app:layout_constraintVertical_bias="0.0" />

    ...
</androidx.constraintlayout.widget.ConstraintLayout>
Toolbarはレイアウトの上部へ接着するように配置します。記述例はバイアスを設けました。
class MainActivity : AppCompatActivity() {
    override fun onCreate(savedInstanceState: Bundle?) {
        super.onCreate(savedInstanceState)
        setContentView(R.layout.activity_main)
        setSupportActionBar(findViewById(R.id.toolbar))
    }
}
後はAction Barの代わりにTool Barを使うようにシステムへ設定します。
テーマでAction Barを非実装へ
「Toolbarウィジェットの配置」で配置は出来たのですが、これだけではExceptionになってしまいます。
※以前はAction Barの下にTool Barが重複して表示されていました。現状(’21/08/05)はExceptionが発生します。
java.lang.IllegalStateException:
This Activity already has an action bar supplied by the window decor.
Do not request Window.FEATURE_SUPPORT_ACTION_BAR and set windowActionBar to false in your theme to use a Toolbar instead.
-----
このActivityはすでにaction barを持っています。
"Window.FEATURE_SUPPORT_ACTION_BAR"を要求しないでください。そして、Toolbarを使うため、あなたのテーマ内のwindowActionBar属性へfalseを設定してください。
これを回避するに、デフォルトで実装されてしまうAction Barを非実装にします。これには2つの方法があります。どちらもテーマを操作します。
テーマはどこで指定されているのか?
アプリのテーマ(Theme.AppTheme)はマニフェストファイルで指定されています。
<?xml version="1.0" encoding="utf-8"?>
<manifest xmlns:android="http://schemas.android.com/apk/res/android"
    package="com.example.myapp">

    <application
        ...
        android:theme="@style/Theme.AppTheme">
        ...
    </application>

</manifest>
その実態はリソースファイル(res/values/themes.xml)の中にあります。
Theme.AppThemeは「Theme.MaterialComponents.DayNight.DarkActionBar」を継承したものです。
<resources xmlns:tools="http://schemas.android.com/tools">
<!-- Base application theme. -->
<style name="Theme.AppTheme" parent="Theme.MaterialComponents.DayNight.DarkActionBar">
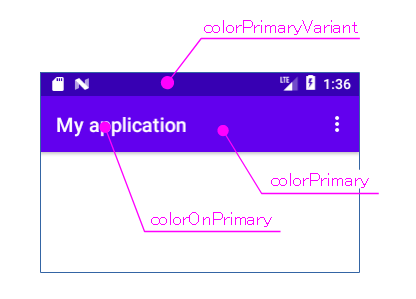
<!-- Primary brand color. -->
<item name="colorPrimary">@color/purple_500</item>
<item name="colorPrimaryVariant">@color/purple_700</item>
<item name="colorOnPrimary">@color/white</item>
...
<!-- Status bar color. -->
<item name="android:statusBarColor" tools:targetApi="l">?attr/colorPrimaryVariant</item>
<!-- Customize your theme here. -->
</style>
</resources>
この「Theme.MaterialComponents.DayNight.DarkActionBar」がAction Bar付きのテーマなのです。
方法1:Action Bar非実装へ属性を設定
Action Barが非実装になるように、テーマ中の属性値を上書きします。
<resources xmlns:tools="http://schemas.android.com/tools">
    <!-- Base application theme. -->
    <style name="Theme.AppTheme" parent="Theme.MaterialComponents.DayNight.DarkActionBar">
        ...
        <!-- Customize your theme here. -->
		<item name="windowActionBar">false</item>
        <item name="windowNoTitle">true</item>
    </style>
</resources>
方法2:Action Bar無しのテーマへ差し替え
継承元のテーマ自体をAction Bar無し(NoActionBar)に差し替えます。
<resources>
    <!-- Base application theme. -->
    <style name="Theme.AppTheme" parent="Theme.MaterialComponents.Light.NoActionBar">
        <!-- Primary brand color. -->
        <item name="colorPrimary">@color/purple_500</item>
        <item name="colorPrimaryVariant">@color/purple_700</item>
        <item name="colorOnPrimary">@color/white</item>
		...
    </style>
</resources>
「Theme.MaterialComponents.Light.NoActionBar」がAction Bar無しのテーマです。
ただし、このテーマはAction Barの背景がライト系(明るい配色)なので、タイトルが黒(暗い配色)になってしまいます。
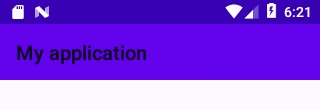
これを回避するには、Tool Barの配色をマテリアルデザインのブランドカラーに対応させます。デフォルトは対応していません。
ブランドカラーとはアプリのテーマ(Theme.AppTheme)中に定義されたColor属性のことです。
<resources>
    <!-- Base application theme. -->
    <style name="Theme.AppTheme" parent="Theme.MaterialComponents.Light.NoActionBar">
        <!-- Primary brand color. -->
        <item name="colorPrimary">@color/purple_500</item>
        <item name="colorPrimaryVariant">@color/purple_700</item>
        <item name="colorOnPrimary">@color/white</item>
		...
    </style>
</resources>
後述する「Tool Barのカスタマイズ/配色の指定」で説明します。
Toolbarのカスタマイズ
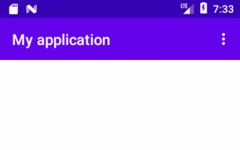
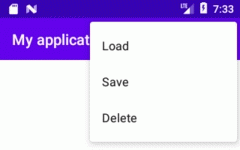
メニューの登録
メニューを登録するとToolbarの右端にオーバーフローメニュー(アイコン)が表示されるようになります。
登録は簡単です。メニューリソース(res/menu/menu_item.xml)に項目を記述して、Activity#onCreateOpetionsMenu( )でメニューを作成するだけです。
<?xml version="1.0" encoding="utf-8"?>
<menu xmlns:android="http://schemas.android.com/apk/res/android">
    <item
        android:id="@+id/menu_load"
        android:title="Load" />
    <item
        android:id="@+id/menu_save"
        android:title="Save" />
    <item
        android:id="@+id/menu_delete"
        android:title="Delete" />
</menu>
class MainActivity : AppCompatActivity() {

    override fun onCreate(savedInstanceState: Bundle?) {
        ...
        setSupportActionBar(findViewById(R.id.toolbar))
    }

    override fun onCreateOptionsMenu(menu: Menu): Boolean {
        val inflater: MenuInflater = menuInflater
        inflater.inflate(R.menu.menu_item, menu)
        return true
    }
}
配色の指定
マテリアルデザインの指標では、Tool Barはブランドカラーで配色します。
ブランドカラー
ブランドカラーとはアプリの特徴を表す色のことです。
例えば、アウトドア向けのアプリなら草木の緑を、企業向けのアプリならコーポレートカラーを、といった具合です。
ブランドカラーはアプリのテーマ(Theme.AppTheme)中に定義されます。
※ちなみに、新規作成のプロジェクトへ定義されるブランドカラーは、「ベースラインカラー」と呼ばれるものです。マテリアルデザインのドキュメント中で紹介されている配色です。
<resources xmlns:tools="http://schemas.android.com/tools">
    <!-- Base application theme. -->
    <style name="Theme.AppTheme" parent="Theme.MaterialComponents.Light.NoActionBar">
        <!-- Primary brand color. -->
        <item name="colorPrimary">@color/purple_500</item>
        <item name="colorPrimaryVariant">@color/purple_700</item>
        <item name="colorOnPrimary">@color/white</item>
        <!-- Secondary brand color. -->
        <item name="colorSecondary">@color/teal_200</item>
        <item name="colorSecondaryVariant">@color/teal_700</item>
        <item name="colorOnSecondary">@color/black</item>
        <!-- Status bar color. -->
        <item name="android:statusBarColor" tools:targetApi="l">?attr/colorPrimaryVariant</item>
        ...
</resources>
Tool Barをブランドカラーで配色する方法は2つあります。
方法1:Toolbar専用のテーマを指定
Android StudioのレイアウトエディターでToolbarを配置した時、属性にToolbarに対するテーマの指定が含まれています。
    <androidx.appcompat.widget.Toolbar
        android:id="@+id/toolbar"
        ...
        android:theme="?attr/actionBarTheme"
        ... />
“?attr/”の意味は「アプリのテーマの中から属性を探して値を返す」です。つまり、actionBarTheme属性を探して、その値をToolbarのtheme属性へ指定します。
しかし、アプリのテーマの中にactionBarTheme属性は定義されていません。
アプリのテーマの中で新規にactionBarTheme属性を定義してあげれば、それがToolbar専用のテーマになります。
<resources xmlns:tools="http://schemas.android.com/tools">
    <!-- Base application theme. -->
    <style name="Theme.AppTheme" parent="Theme.MaterialComponents.Light.NoActionBar">
        ...
        <!-- Customize your theme here. -->

        <!-- アクションバーの非表示(ツールバー置き換えのため) -->
        <item name="windowActionBar">false</item>
        <item name="windowNoTitle">true</item>

        <!-- ToolBarをブランドカラーに対応させる -->
        <item name="actionBarTheme">@style/MyActionBar</item>
    </style>

    <style name="MyActionBar" parent="Widget.MaterialComponents.ActionBar.Primary">
	    <!-- バー上のタイトルの色 -->
        <item name="android:textColorPrimary">?attr/colorOnPrimary</item>
		<!-- バー上のアイコンの色 -->
        <item name="colorControlNormal">?attr/colorOnPrimary</item>
		<!-- バーを浮いたように見せる -->
		<item name="android:elevation">4dp</item>
    </style>
</resources>
MyActionBarがToolbar専用のテーマです。
マテリアルデザインの設定が施されたアクションバー向けのスタイルWidget.MaterialComponents.ActionBar.Primaryを継承して作っています。
方法2:Toolbarのスタイルを指定
Android StudioのレイアウトエディターでToolbarを配置した時、属性にToolbarに対するテーマの指定が含まれています。
この部分をスタイルの指定へ置き換えます。※元は”android:theme”だった部分
    <androidx.appcompat.widget.Toolbar
        android:id="@+id/toolbar"
        ...
        style="@style/Widget.MaterialComponents.Toolbar.Primary"
        ... />
マテリアルデザインの設定が施されたツールバー向けのスタイルWidget.MaterialComponents.Toolbar.Primaryを指定します。