
GUIを用いたアプリのテストで、テストの開始前にアニメーションを無効化することが定石となっています。理由は「テストの安定性を確保するためである」と、ドキュメントに記載されています。
この無効化の処理を自動で行えたら便利です。なので、アニメーションを無効にするテストルールを作成してみました。
アニメーションスケール
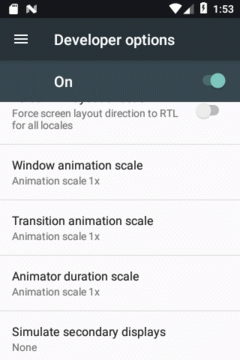
Android端末のDeveloper Optionsを有効にすると、アニメーションスケールという項目が変更可能になります。
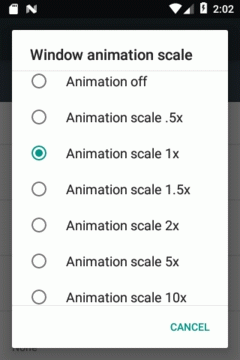
スケールとはアニメーションが変化するスピードを表しています。デフォルトは1.0×です。2.0×は2倍の時間をかけてアニメーションが変化し、0.0×はアニメーションが即座に終了します。0.0×はアニメーションをしないので無効であることを表しています。
「テストの開始前にアニメーションを無効化する」とは次に示す3項目を無効にすることです。
| Developer Options | XXX scaleをクリックすると |
|---|---|
 |  |
| スケール | 影響範囲 | 具体例 |
|---|---|---|
| Window animation | ポップアップされるウィンドウの開閉時 | Toast |
| Transition animation | コンポーネントの遷移時 | Activityの開閉 ホーム画面の表示 |
| Animator duration | Viewのアニメーション | ObjectAnimator Snackbarの開閉 |
スケールを変更する方法
adb shellコマンドのsettingsツールを使って変更します。
アニメーションスケールはSettings.Globalに属しています。Settings.Globalに登録されているキーを指定してget/putすれば変更が可能です。
テストではUiDevice(UiAutomator)からadb shellコマンドが発行できるので、これを使います。
スケールの取得
    fun getWindowAnimationScale(): Float
        = _GetScale(Settings.Global.WINDOW_ANIMATION_SCALE)
    fun getTransitionAnimationScale(): Float
        = _GetScale(Settings.Global.TRANSITION_ANIMATION_SCALE)
    fun getAnimatorDurationScale(): Float
        = _GetScale(Settings.Global.ANIMATOR_DURATION_SCALE)

    private fun _GetScale(name: String): Float {
        val _UiDevice = UiDevice.getInstance(
                InstrumentationRegistry.getInstrumentation()
        )
        val _Command = String.format("settings get global %s", name)
        val _Result = _UiDevice.executeShellCommand(_Command)
        if (!_Result.startsWith("null")) {
            val _Scale = java.lang.Float.valueOf(_Result)
            if (_Scale >= 0.0f) {
                return _Scale
            }
        }
        return 1.0f
    }
    public float getWindowAnimationScale() throws IOException {
        return _GetScale(Settings.Global.WINDOW_ANIMATION_SCALE);
    }
    public float getTransitionAnimationScale() throws IOException {
        return _GetScale(Settings.Global.TRANSITION_ANIMATION_SCALE);
    }
    public float getAnimatorDurationScale() throws IOException {
        return _GetScale(Settings.Global.ANIMATOR_DURATION_SCALE);
    }

    private float _GetScale(String name) throws IOException {
        UiDevice _UiDevice = UiDevice.getInstance(
                InstrumentationRegistry.getInstrumentation()
        );
        String _Command = String.format("settings get global %s", name);
        String _Result = _UiDevice.executeShellCommand(_Command);
        if (! _Result.startsWith("null")) {
            float _Scale = Float.valueOf(_Result);
            if(_Scale >= 0.0f) {
                return _Scale;
            }
        }
        return 1.0f;
    }
AVD(Android Virtual Device)の作成直後はスケールの取得を行うと”null”を返すので対応が必要です。”null”を返しますが1.0×と同じ動作をするので、デフォルト:1.0×を返すようにしています。スケールの操作を行うと設定したスケール値が返るようになります。
スケールの設定
    fun putWindowAnimationScale(scale: Float) {
        _PutScale(Settings.Global.WINDOW_ANIMATION_SCALE, scale)
    }
    fun putTransitionAnimationScale(scale: Float) {
        _PutScale(Settings.Global.TRANSITION_ANIMATION_SCALE, scale)
    }
    fun putAnimatorDurationScale(scale: Float) {
        _PutScale(Settings.Global.ANIMATOR_DURATION_SCALE, scale)
    }

    private fun _PutScale(name: String, scale: Float) {
        val _UiDevice = UiDevice.getInstance(
                InstrumentationRegistry.getInstrumentation()
        )
        val _Command = String.format("settings put global %s %f", name, scale)
        _UiDevice.executeShellCommand(_Command)
    }
    public void putWindowAnimationScale(float scale) throws IOException {
        _PutScale(Settings.Global.WINDOW_ANIMATION_SCALE, scale);
    }
    public void putTransitionAnimationScale(float scale) throws IOException {
        _PutScale(Settings.Global.TRANSITION_ANIMATION_SCALE, scale);
    }
    public void putAnimatorDurationScale(float scale) throws IOException {
        _PutScale(Settings.Global.ANIMATOR_DURATION_SCALE, scale);
    }

    private void _PutScale(String name, float scale) throws IOException {
        UiDevice _UiDevice = UiDevice.getInstance(
                InstrumentationRegistry.getInstrumentation()
        );
        String _Command = String.format("settings put global %s %f", name, scale);
        _UiDevice.executeShellCommand(_Command);
    }
ただ、この方法には注意点があります。
- API<24の場合、スケール値を反映させるためにAndroid端末のリブートが必要
(putした値がgetで読み出せるが反映されない)
テストルールの作成
「スケールを変更する方法」の注意点を考慮して、テストルールは次のような仕様にしました。
- adb shellコマンドのsettingsツールを使って変更する
- API≧24で動作
- テスト後にテスト前の状態へ戻す
@TargetApi(24)
class AnimationTestRule : TestRule {

    private val currWinScale = getWindowAnimationScale()
    private val currTraScale = getTransitionAnimationScale()
    private val currDurScale = getAnimatorDurationScale()

    // ----- ルール本体 -------------------------------------------------------
    override fun apply(base: Statement, description: Description): Statement {
        return object : Statement() {
            override fun evaluate() {
                try {
                    putWindowAnimationScale(0.0f)           // 前処理
                    putTransitionAnimationScale(0.0f)
                    putAnimatorDurationScale(0.0f)
                    base.evaluate()                         // テストの実施
                } finally {
                    putWindowAnimationScale(currWinScale)  // 後処理
                    putTransitionAnimationScale(currTraScale)
                    putAnimatorDurationScale(currDurScale)
                }
            }
        }
    }

    ...
}
@TargetApi(24)
public class AnimationTestRule implements TestRule {

    private float mCurrWinScale = 1.0f;
    private float mCurrTraScale = 1.0f;
    private float mCurrDurScale = 1.0f;

    public AnimationTestRule_j() {
        try {
            mCurrWinScale = getWindowAnimationScale();
            mCurrTraScale = getTransitionAnimationScale();
            mCurrDurScale = getAnimatorDurationScale();
        }
        catch (IOException e) {
            e.printStackTrace();
        }
    }

    // ----- ルール本体 -------------------------------------------------------
    @Override
    public Statement apply(final Statement base, Description description) {
        return new Statement() {
            @Override
            public void evaluate() throws Throwable {
                try {
                    putWindowAnimationScale(0.0f); // 前処理
                    putTransitionAnimationScale(0.0f);
                    putAnimatorDurationScale(0.0f);
                    base.evaluate(); // テストの実施
                }
                finally {
                    putWindowAnimationScale(mCurrWinScale); // 後処理
                    putTransitionAnimationScale(mCurrTraScale);
                    putAnimatorDurationScale(mCurrDurScale);
                }
            }
        };
    }

    ...
}
テストルールの使用方法
使用方法はその他のテストルールと変わりません。@Ruleを付けてプロパティ(Javaの場合はフィールド)を宣言するだけです。
テストメソッドの途中でもputWindowAnimationScale/putTransitionAnimationScame/putAnimatorDurationScaleを用いてスケールの変更が可能です。
class Sample_Test {

    @get:Rule
    var animationRule = AnimationTestRule()

    // ------------------------------------------------------------------------
    @Test
    fun Snackbarの表示() {
        onView(withId(R.id.btnSnackBar)).perform(click())
        onView(withText("スナックバーを開きました!")).check(matches(isDisplayed()))

        animationRule.putAnimatorDurationScale(5.0f)
        assertThat(animationRule.getAnimatorDurationScale()).isEqualTo(5.0f)

        ...
    }
}
public class Sample_Test {

    @Rule
    public AnimationTestRule mAnimationRule = new AnimationTestRule();

    // ------------------------------------------------------------------------
    @Test
    public void Snackbarの表示() throws Exception {
        onView(withId(R.id.btnSnackBar)).perform(click());
        onView(withText("スナックバーを開きました!")).check(matches(isDisplayed()));

        mAnimationRule.putAnimatorDurationScale(5.0f);
        assertThat(mAnimationRule.getAnimatorDurationScale()).isEqualTo(5.0f);

        ...
    }
}