
アプリを構成する最上位の構成要素がアプリケーションコンポーネント(App component)です。
Activityはアプリケーションコンポーネントの1つです。アプリケーションの画面と処理を構築します。
Activityについてまとめます。
目次
Activityとは
アプリの画面と処理を構築するアプリケーションコンポーネントです。
アプリはUI(User Interface:情報の表示とタッチスクリーンを使った操作)を実現するために、必ず1つ以上のActivityを持ちます。
Activity当たり1枚の画面を構築します。ですので、アプリの中にActivityが2つあれば、2枚の画面で構成されたアプリです。
Activity雛形の作成
プロジェクトを作成すると、最初(1枚目)のActivityはAndroid Studioが作成してくれます。
2枚目以降もAndroid Studioで自動作成が可能です。
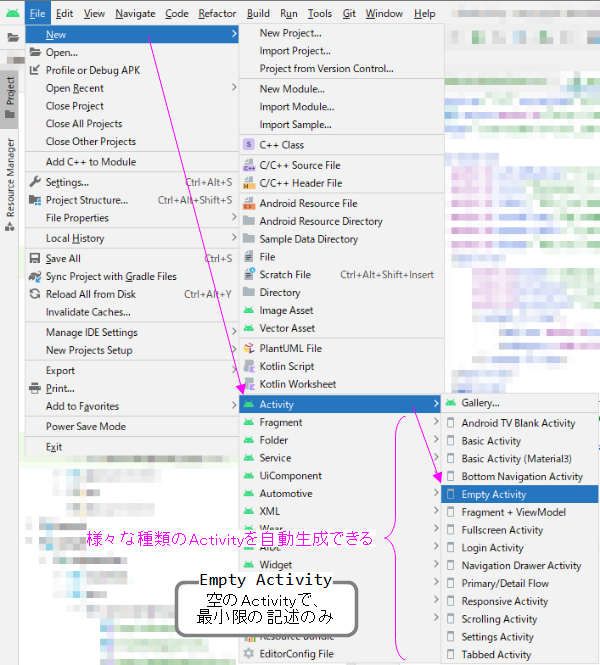
自動作成は次のことを行っています。
(1)AppCompatActivityを継承した***Activityクラスを作成
(2)レイアウトのリソースファイル:activity_***.xmlを作成
(3)AndroidManifest.xmlへ***Activityの記述を追加
※***:任意な名前
class ***Activity : AppCompatActivity() {
    override fun onCreate(savedInstanceState: Bundle?) {
        super.onCreate(savedInstanceState)
        setContentView(R.layout.activity_sample)
    }
}
<?xml version="1.0" encoding="utf-8"?>
<androidx.constraintlayout.widget.ConstraintLayout xmlns:android="http://schemas.android.com/apk/res/android"
    xmlns:app="http://schemas.android.com/apk/res-auto"
    xmlns:tools="http://schemas.android.com/tools"
    android:layout_width="match_parent"
    android:layout_height="match_parent"
    tools:context=".SampleActivity">

</androidx.constraintlayout.widget.ConstraintLayout>
<?xml version="1.0" encoding="utf-8"?>
<manifest xmlns:android="http://schemas.android.com/apk/res/android"
    package="com.example.myapp">

    <application ... >
        <activity
            android:name=".SampleActivity"
            android:exported="false" />
        <activity
            android:name=".MainActivity"
            android:exported="true">
            <intent-filter>
                <action android:name="android.intent.action.MAIN" />
                <category android:name="android.intent.category.LAUNCHER" />
            </intent-filter>
        </activity>
    </application>

</manifest>
Android Studioの自動作成を使わないのであれば、(1)~(3)を手作業で行います。
Activityの画面を構築
ActivityはDecorViewと呼ばれる1枚の画面を管理しています。
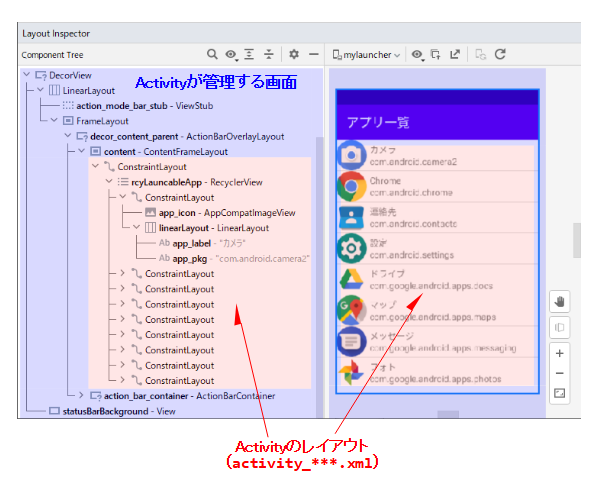
DecorViewの下位階層にあるContentFrameLayout(ID:content)へ、Activityのレイアウト(activity_***.xml)を追加(ViewGroup#addView)することで、アプリの画面を構築しています。
この追加を行っているのが、setContentView( )関数です。
class SampleActivity : AppCompatActivity() {
    override fun onCreate(savedInstanceState: Bundle?) {
        super.onCreate(savedInstanceState)
        setContentView(R.layout.activity_sample)
    }
}
setContentVIew( )関数は、引数にリソースIDを指定するタイプの他に、次のようなものが用意されています。
    @Override
    public void setContentView(View v) {
        ensureSubDecor();
        ViewGroup contentParent = mSubDecor.findViewById(android.R.id.content);
        contentParent.removeAllViews();
        contentParent.addView(v);
        mAppCompatWindowCallback.bypassOnContentChanged(mWindow.getCallback());
    }

    @Override
    public void setContentView(int resId) {
        ensureSubDecor();
        ViewGroup contentParent = mSubDecor.findViewById(android.R.id.content);
        contentParent.removeAllViews();                              // 全て消去
        LayoutInflater.from(mContext).inflate(resId, contentParent); // 挿入
        mAppCompatWindowCallback.bypassOnContentChanged(mWindow.getCallback());
    }                             // 「全て消去⇒挿入」なので「入れ替え」に等しい

    @Override
    public void setContentView(View v, ViewGroup.LayoutParams lp) {
        ensureSubDecor();
        ViewGroup contentParent = mSubDecor.findViewById(android.R.id.content);
        contentParent.removeAllViews();
        contentParent.addView(v, lp);
        mAppCompatWindowCallback.bypassOnContentChanged(mWindow.getCallback());
    }
setContentView( )の記述を見ればわかる通り、ContentFrameLayout(ID:content)はコンテナタイプのViewで、Activityのレイアウトの「追加」というよりは「入れ替え」であることが分かります。
Activityの処理を構築
Activityはライフサイクルを持ちます。※詳細は「Activityのライフサイクル」を参照。
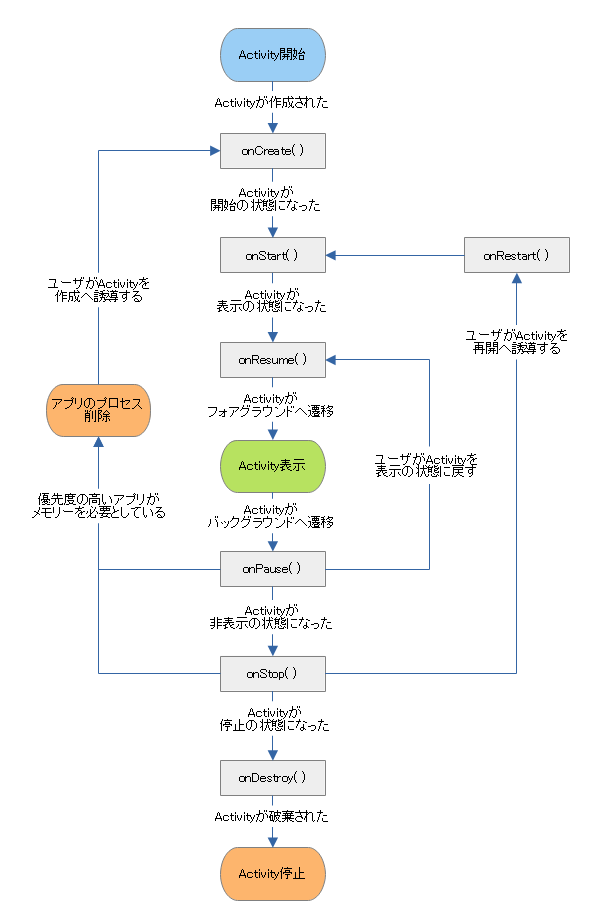
Activityの処理はライフサイクルで呼ばれる関数内で行うことになります。
class ***Activity : AppCompatActivity() {
    override fun onCreate(savedInstanceState: Bundle?) {
        super.onCreate(savedInstanceState)
        setContentView(R.layout.activity_***)
        // Activityの処理
    }
    override fun onRestart() {
        super.onRestart()
        // Activityの処理
    }
    override fun onStart() {
        super.onStart()
        // Activityの処理
    }
    override fun onResume() {
        super.onResume()
        // Activityの処理
    }
    override fun onPause() {
        super.onPause()
        // Activityの処理
    }
    override fun onStop() {
        super.onStop()
        // Activityの処理
    }
    override fun onDestroy() {
        super.onDestroy()
        // Activityの処理
    }
}
ただし、ライフサイクルで呼ばれる関数はメインスレッドで実行される点に注意してください。
この関数で重い処理を行うと、滑らかに動くアニメーション効果が得られなくなったり、タッチスクリーンによるリアルタイムな操作感が失われたりします。
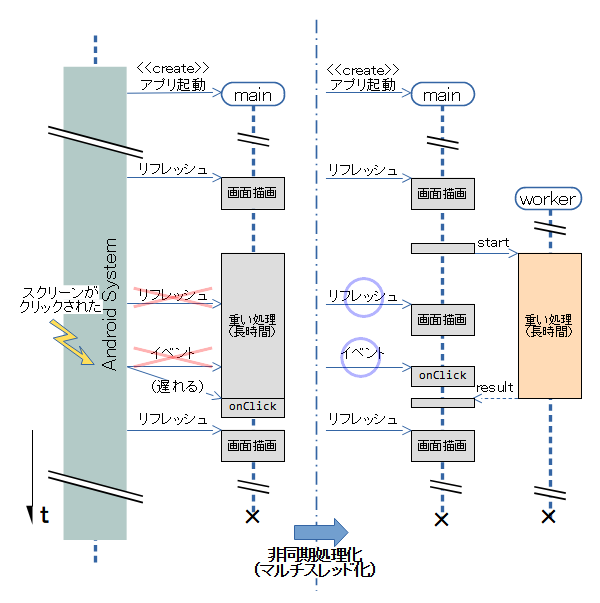
ですので、重い処理を実行する場合は非同期処理にします。
※詳細は「Kotlin:コルーチン(Coroutine)」を参照
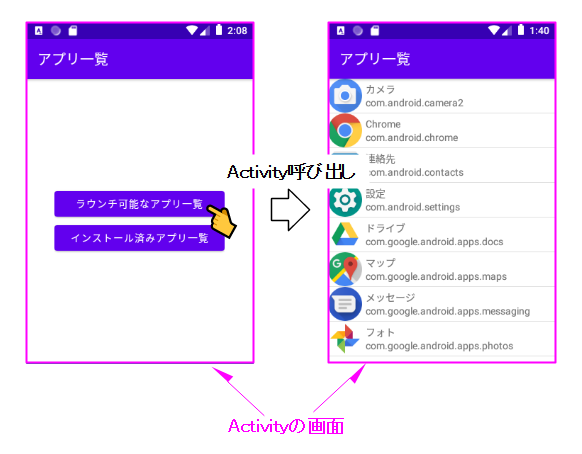
Activityの連携
端末内でコンポーネント(ここではActivityのこと)は連携して動作します。「連携」とはコンポーネントが互いに呼び出し合いながら協調して動くという意味です。
この「呼び出し」はアプリ内のコンポーネントに限りません。アプリ外も呼び出しの対象になります。
「連携」を行うことで、アプリの機能が容易に拡充できます。
※詳細は「アプリケーションコンポーネント(App component)」を参照
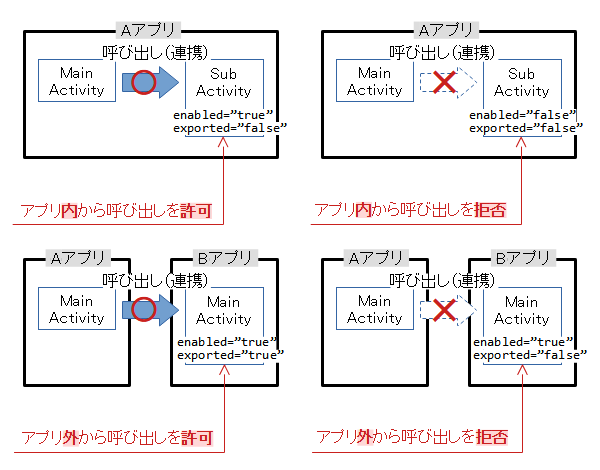
呼び出しの許可・拒否
コンポーネントの呼び出しを許可・拒否する仕組みがあります。
セキュリティ確保のため、またはアプリ自身の都合のため、呼び出されたくないコンポーネントがあるからです。
許可・拒否はマニフェストに記述するEnabledとExported属性で行います。
属性の基本的な動作は表の通りです。
| Enabled | インスタンス化 | Exported | アプリ内から 呼出し | アプリ外から 呼出し |
|---|---|---|---|---|
| true | ○ (記述なしの場合) | true | ○ | ○ |
| false | ○ | × | ||
| false | × | true | × (インスタンス化できないので全てにおいて拒否) |
|
| false | ||||
| ※○:許可、×:拒否 | ||||
呼び出す方法のタイプ
Activityを呼び出す方法を分類すると表のようになります。
| 結果 | 関数 | タイプ | アプリ内から 呼び出し | アプリ外から 呼び出し |
|---|---|---|---|---|
| 返さない | Context#startActivity( intent ) | 明示的 | ||
| 暗黙的 | ||||
| 返す | Context#startActivityForResult( intent, requestCode ) ※ | 明示的 | ||
| 暗黙的 | ||||
| Activity Result API ※ | 明示的 | |||
| 暗黙的 | ||||
| ※○:可能、×:不可能 ※Enabled/Exportedにより呼び出し許可の場合 ※startActivityForResultはライブラリandroidx.activity:activity≧1.20で非推奨 代わりにActiviry Result APIの使用を推奨 |
||||
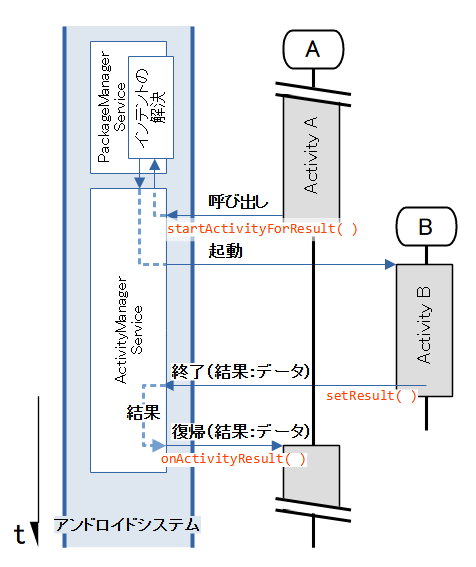
「結果を返す」は呼び出し先のActivity(B)から呼び出し元へのActivity(A)へデータを返すことです。
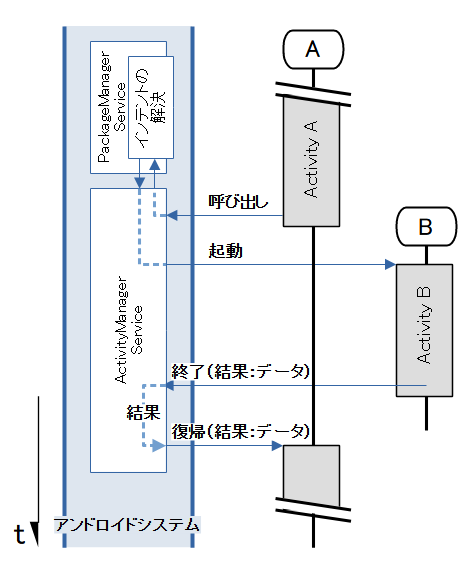
明示的と暗黙的は「インテントの解決」におけるコンポーネント選択の動作の違いです。
| タイプ | 起動したいコンポーネント | コメント |
|---|---|---|
| 明示的 | コンポーネント名を指定 起動対象は必ず一つに確定 | コンポーネント名が明確である場合 |
| 暗黙的 | コンポーネントの条件を指定 起動対象は複数の場合あり | コンポーネントの条件は一般的な項目 |
引数のIntentへ指定する「起動したいコンポーネント」の内容で変わります。
val _intent = Intent(context: Context, cls: Class)
val _intent = Intent().setClassName(packageName: String, className: String)
val _intent = Intent().setClassName(context: Context, className: String)
val _intent = Intent().setClass(context: Context, cls: Class)
            val _intent = Intent(action: String)
            val _intent = Intent(action: String, uri: Uri)
            val _intent = Intent().apply {
                setAction(action: String)
                addCategory(category: String)
                setData(uri: Uri)      // setDataとsetTypeは同時に使えない
                setType(mime: String)  //  ⇒ 同時に使う場合はsetDataAndTypeを使用
                setDataAndType(uri: Uri, mime: String)
            }
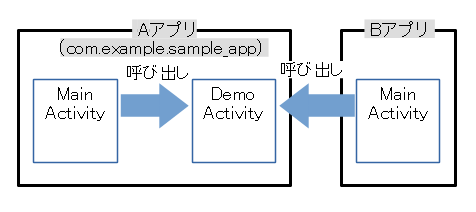
呼び出し例1:結果を返さない+明示的
Activityの「結果を返さない+明示的」呼び出しの例です。
1つはアプリ内(AのMain⇒AのDemo)から、もう一つはアプリ外(BのMain⇒AのDemo)から呼び出しています。
<?xml version="1.0" encoding="utf-8"?>
<manifest xmlns:android="http://schemas.android.com/apk/res/android"
    package="com.example.sample_app">
	<application ... >
        <activity
            android:name=".DemoActivity"
            android:enabled="true"
            android:exported="true" />
         <activity
            android:name=".MainActivity"
            android:exported="true">
            <intent-filter>
                <action android:name="android.intent.action.MAIN" />
                <category android:name="android.intent.category.LAUNCHER" />
            </intent-filter>
        </activity>
    </application>
</manifest>
class MainActivity : AppCompatActivity() {
    ...
    override fun onCreate(savedInstanceState: Bundle?) {
        ...
        findViewById<Button>(R.id.btnDemo).setOnClickListener({
            val _intent = Intent(this, DemoActivity::class.java)
            startService(_intent)
        })
		...
    }
	...
}
class MainActivity : AppCompatActivity() {
    ...
    private val targetAppPkg = "com.example.sample_app"

    override fun onCreate(savedInstanceState: Bundle?) {
        ...
        findViewById<Button>(R.id.btnDemo).setOnClickListener({
            val _intent = Intent().setClassName(
                targetAppPkg,
                "${targetAppPkg}.DemoActivity"
            )
            startActivity(_intent)
        })
		...
    }
	...
}
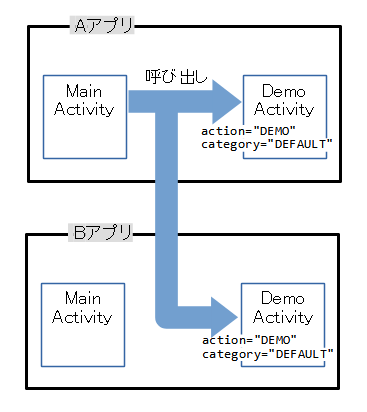
呼び出し例2:結果を返さない+暗黙的
Activityの「結果を返さない+暗黙的」呼び出しの例です。
1つはアプリ内(AのMain⇒AのDemo)から、もう一つはアプリ外(AのMain⇒BのDemo)から呼び出しています。
<?xml version="1.0" encoding="utf-8"?>
<manifest xmlns:android="http://schemas.android.com/apk/res/android"
    package="com.example.sample_app">
	<application ... >
        <activity
            android:name=".DemoActivity"
            android:enabled="true"
            android:exported="true">
            <intent-filter>
                <action android:name="com.example.action.DEMO" />
                <category android:name="android.intent.category.DEFAULT" />
            </intent-filter>
         </activity>
         <activity
            android:name=".MainActivity"
            android:exported="true">
            <intent-filter>
                <action android:name="android.intent.action.MAIN" />
                <category android:name="android.intent.category.LAUNCHER" />
            </intent-filter>
        </activity>
    </application>
</manifest>
<?xml version="1.0" encoding="utf-8"?>
<manifest xmlns:android="http://schemas.android.com/apk/res/android"
    package="com.example.test_app">
	<application ... >
        <activity
            android:name=".DemoActivity"
            android:enabled="true"
            android:exported="true">
            <intent-filter>
                <action android:name="com.example.action.DEMO" />
                <category android:name="android.intent.category.DEFAULT" />
            </intent-filter>
         </activity>
         <activity
            android:name=".MainActivity"
            android:exported="true">
            <intent-filter>
                <action android:name="android.intent.action.MAIN" />
                <category android:name="android.intent.category.LAUNCHER" />
            </intent-filter>
        </activity>
    </application>
</manifest>
const val ACTION_DEMO = "com.example.action.DEMO"

class MainActivity : AppCompatActivity() {
    ...
    override fun onCreate(savedInstanceState: Bundle?) {
        ...
        findViewById<Button>(R.id.btnDemo).setOnClickListener({
            val _intent = Intent(ACTION_DEMO)
			    .addCategory(Intent.CATEGORY_DEFAULT)
            startService(_intent)
        })
		...
    }
	...
}
以下は、起動するコンポーネントの最終的な判断をユーザに求めています。action=”com.example.action.DEMO”の条件に一致したコンポーネントが複数あるためです。
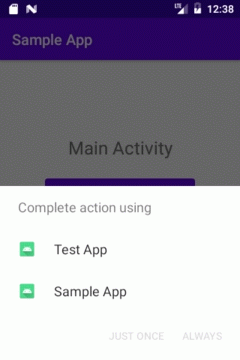
ユーザによりクリックされたコンポーネントが起動します。
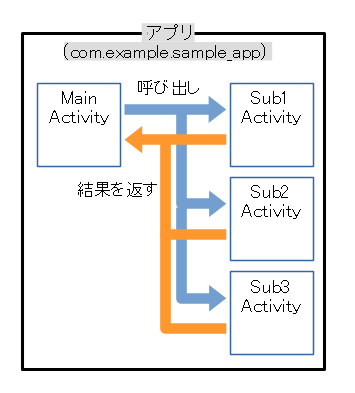
呼び出し例3:結果を返す(startActivityForResult関数)
Activityの「結果を返す」呼び出しの例です。
startActivityForResultを用いた方法は、ライブラリandroidx.activity:activity≧1.20で非推奨となっています。
<?xml version="1.0" encoding="utf-8"?>
<manifest xmlns:android="http://schemas.android.com/apk/res/android"
    package="com.example.sample_app">
    <application ... >
        <activity
            android:name="com.example.sample_app.Sub3Activity"
            android:enabled="true"
            android:exported="false" />
        <activity
            android:name="com.example.sample_app.Sub2Activity"
            android:enabled="true"
            android:exported="false" />
        <activity
            android:name="com.example.sample_app.Sub1Activity"
            android:enabled="true"
            android:exported="false" />
        <activity
            android:name="com.example.sample_app.MainActivity"
            android:exported="true">
            <intent-filter>
                <action android:name="android.intent.action.MAIN" />
                <category android:name="android.intent.category.LAUNCHER" />
            </intent-filter>
        </activity>
    </application>
</manifest>
const val REQUEST_CODE_SUB1 = 111
const val REQUEST_CODE_SUB2 = 222
const val REQUEST_CODE_SUB3 = 333
const val RESULT_CODE_OK = 0
const val RESULT_CODE_NG = 1

class MainActivity : AppCompatActivity() {

    override fun onCreate(savedInstanceState: Bundle?) {
        super.onCreate(savedInstanceState)
        setContentView(R.layout.activity_main)

        findViewById<Button>(R.id.btnSub1).setOnClickListener {
		    // Sub1Activityの呼び出し
            val _intent = Intent(this, Sub1Activity::class.java)
            startActivityForResult(_intent, REQUEST_CODE_SUB1)
        }
        findViewById<Button>(R.id.btnSub2).setOnClickListener {
		    // Sub2Activityの呼び出し
			val _intent = Intent(this, Sub2Activity::class.java)
            startActivityForResult(_intent, REQUEST_CODE_SUB2)
        }
        findViewById<Button>(R.id.btnSub3).setOnClickListener {
		    // Sub2Activityの呼び出し
			val _intent = Intent(this, Sub3Activity::class.java)
            startActivityForResult(_intent, REQUEST_CODE_SUB3)
        }
    }

    override fun onActivityResult(    // Sub[123]Activityから結果を受け取る
	    requestCode: Int, resultCode: Int, data: Intent?
    ) {
        super.onActivityResult(requestCode, resultCode, data)

        when(requestCode) {
            REQUEST_CODE_SUB1 -> {  // 呼び出し⇒結果のペアを分岐
                if (resultCode == RESULT_CODE_OK)
                    data?.let {
					    val _result = data.getStringExtra("data")
						// 結果はIntentに含まれる
                        ...
                    }
                return
            }
            REQUEST_CODE_SUB2 -> { /* 同上 */ }
            REQUEST_CODE_SUB3 -> { /* 同上 */ }
            else -> {}
        }
        ...
    }
}
class Sub1Activity : AppCompatActivity() {
    override fun onCreate(savedInstanceState: Bundle?) {
        super.onCreate(savedInstanceState)
        setContentView(R.layout.activity_sub1)

        findViewById<Button>(R.id.btnFinish).setOnClickListener {
            setResult(RESULT_CODE_OK, intent.putExtra("data", "111"))
			// setResult( )で結果を返す
			//  RESULT_COLDE_OK:結果が正しく求められた
			//  結果はIntentに含めて返す、例:"111"が結果
            finish()
        }
    }
}
複数のActivityが結果を返す場合、全ての結果を単一のコールバックonActivityResult( )で受け取り、リクエストコード(REQUEST_CODE_SUB1,2,3)を使って処理を分岐する必要があります。
つまり、リクエストコードを開発者自身が管理します。
呼び出し例4:結果を返す(Activity Result API)
Activityの「結果を返す」呼び出しの例です。
Activity Result APIを用いた方法はstartActivityForResultに代わり、ライブラリandroidx.activity:activity≧1.20で推奨となっています。
<?xml version="1.0" encoding="utf-8"?>
<manifest xmlns:android="http://schemas.android.com/apk/res/android"
    package="com.example.sample_app">
    <application ... >
        <activity
            android:name="com.example.sample_app.Sub3Activity"
            android:enabled="true"
            android:exported="false" />
        <activity
            android:name="com.example.sample_app.Sub2Activity"
            android:enabled="true"
            android:exported="false" />
        <activity
            android:name="com.example.sample_app.Sub1Activity"
            android:enabled="true"
            android:exported="false" />
        <activity
            android:name="com.example.sample_app.MainActivity"
            android:exported="true">
            <intent-filter>
                <action android:name="android.intent.action.MAIN" />
                <category android:name="android.intent.category.LAUNCHER" />
            </intent-filter>
        </activity>
    </application>
</manifest>
const val RESULT_CODE_OK = 0
const val RESULT_CODE_NG = 1

class MainActivity : AppCompatActivity() {

    override fun onCreate(savedInstanceState: Bundle?) {
        super.onCreate(savedInstanceState)
        setContentView(R.layout.activity_main)

        val _launcher1 = registerForActivityResult(
            ActivityResultContracts.StartActivityForResult()
        ) {
		    // ここから ラムダ式で定義したコールバック関数
            if (it.resultCode == RESULT_CODE_OK)
                it.data?.let {
                    val _result = data.getStringExtra("data")
                    // 結果はIntentに含まれる
                    ...
                }
            else
                ...
		    // ここまで
        }
        findViewById<Button>(R.id.btnSub1).setOnClickListener {
            // Sub1Activityの呼び出し
			val _intent = Intent(this, Sub1Activity::class.java)
            _launcher1.launch(_intent)
        }

        val _launcher2 = registerForActivityResult(
            ActivityResultContracts.StartActivityForResult()
        ) { /* 同上 */ }
        findViewById<Button>(R.id.btnSub2).setOnClickListener {
            // Sub2Activityの呼び出し
			val _intent = Intent(this, Sub2Activity::class.java)
            _launcher2.launch(_intent)
        }

        val _launcher3 = registerForActivityResult(
            ActivityResultContracts.StartActivityForResult()
        ) { /* 同上 */ }
        findViewById<Button>(R.id.btnSub3).setOnClickListener {
            // Sub3Activityの呼び出し
			val _intent = Intent(this, Sub3Activity::class.java)
            _launcher3.launch(_intent)
        }
    }
}
class Sub1Activity : AppCompatActivity() {
    override fun onCreate(savedInstanceState: Bundle?) {
        super.onCreate(savedInstanceState)
        setContentView(R.layout.activity_sub1)

        findViewById<Button>(R.id.btnFinish).setOnClickListener {
            setResult(RESULT_CODE_OK, intent.putExtra("data", "111"))
			// setResult( )で結果を返す
			//  RESULT_COLDE_OK:結果が正しく求められた
			//  結果はIntentに含めて返す、例:"111"が結果
            finish()
        }
    }
}
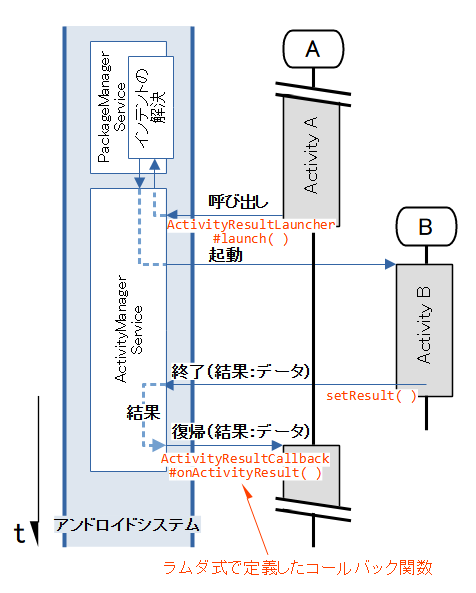
複数のActivityが結果を返す場合、各々の結果を各々のランチャーに定義したコールバックonActivityResult( )で受け取り、処理します。
Activity Result APIシステムの内部では、リクエストコードがやり取りされています。しかし、ブラックボックス化されていて開発者に見えません。
つまり、リクエストコードをシステムが管理します。
注意:暗黙的インテントはCATEGORY_DEFAULTを付与
startActivity( )やstartActivityForResult( )は、暗黙的インテントにIntent.CATEGORY_DEFAULTを付与します。
ですので、マニフェストでカテゴリに”android.intent.category.DEFAULT”を持たないActivityは、暗黙的な呼び出しができません。
        <activity
            android:name=".DemoActivity"
            android:enabled="true"
            android:exported="true">
            <intent-filter>
                <action android:name="com.example.action.DEMO" />
				<!-- categoryの指定がない -->
            </intent-filter>
        </activity>
        <activity
            android:name=".DemoActivity"
            android:enabled="true"
            android:exported="true">
            <intent-filter>
                <action android:name="com.example.action.DEMO" />
                <category android:name="android.intent.category.DEFAULT" />
            </intent-filter>
        </activity>
const val ACTION_DEMO = "com.example.action.DEMO"

...
{
    ...
    val _intent = Intent(ACTION_DEMO)
    this@MainActivity.startActivity(_intent) // Intent.CATEGORY_DEFAULTを付与する
	...
}
呼び出しが出来なかった場合はActivityNotFoundExceptionとなり、アプリを停止します。
android.content.ActivityNotFoundException:
    No Activity found to handle Intent { act=com.example.action.DEMO }
関連記事: