
コルーチン(Coroutine)は「非同期処理の手法」の1つです。
Kotlinが提供します。
コルーチンを開始するasyncビルダーの仕組みについて、まとめます。
※仕組みの解析は次のバージョンを対象に行っています。
Kotlin:Ver 1.6.10
org.jetbrains.kotlinx:kotlinx-coroutines-android:1.3.9
目次
asyncビルダーのバイトコード
asyncビルダーはCoroutineScopeに定義された拡張関数です。
※asyncビルダーの動作は「Coroutine:asyncビルダーでコルーチン開始」を参照
public fun <T> CoroutineScope.async(
    context: CoroutineContext = EmptyCoroutineContext,
    start: CoroutineStart = CoroutineStart.DEFAULT,
    block: suspend CoroutineScope.() -> T
): Deferred<T> {
    val newContext = newCoroutineContext(context)
    val coroutine = if (start.isLazy)
        LazyDeferredCoroutine(newContext, block) else
        DeferredCoroutine<T>(newContext, active = true)
    coroutine.start(start, coroutine, block)
    return coroutine
}
ソースコードは上記のように記述されていますが、バイトコードではKotlinコンパイラにより次のように変換されます。
    public static final <T> Deferred<T> async(
	    CoroutineScope coroutineScope,
		CoroutineContext context,
		CoroutineStart start,
		Function2 function2					  // (1)タスクブロックを格納したクラス
	) {
        LazyDeferredCoroutine coroutine;
        CoroutineContext newContext = CoroutineContextKt.newCoroutineContext(coroutineScope, context);
        if (start.isLazy()) {
            coroutine = new LazyDeferredCoroutine(newContext, function2);
        } else {
            coroutine = new DeferredCoroutine(newContext, true);
        }
        coroutine.start(start, coroutine, function2);	// (3)コルーチンを開始する
        return coroutine;		                // (2)コールバックを受け取るクラス
    }
変換されたバイトコードのポイントは次の3つです。
(1)タスクブロックを格納したクラス(Coroutineクラス ※後述)
(2)コールバックを受け取るクラス(DeferredCoroutineクラス)
(3)コルーチンを開始するAbstractCoroutine#start( )
タスクブロックを格納したクラス…(1)
Kotlinコンパイラはバイトコードへ変換する時に、タスクブロック(asyncの引数に指定したラムダ式)を格納したクラスを作成します。
Coroutineクラス
タスクブロックを格納したクラス(MainActivity$onCreate$1$1)の例です。
以下のようなasyncでコルーチンを開始した場合の動作を考えます。
        findViewById<Button>(R.id.btnStart).setOnClickListener {
            // asyncの仕組み(シンプルなタスク)
            scope = SampleScope()
            scope?.async(Dispatchers.Default) {
                println("Start")
                Thread.sleep(2000)  // 重い処理の代わり
                println("End")
            }
        }
次のようなクラスが作成されます。クラス名はコンパイラが重複しない名前を付けます。
final class MainActivity$onCreate$1$1
    extends SuspendLambda
	implements Function2<CoroutineScope, Continuation<? super Unit>, Object>
{
    int label;

    public MainActivity$onCreate$1$1(
	    Continuation<? super MainActivity$onCreate$1$1> continuation
	) {
        super(2, continuation);
    }

    @Override // kotlin.coroutines.jvm.internal.BaseContinuationImpl
    public final Continuation<Unit> create(
	    Object obj, Continuation<?> continuation
	) {
        return new MainActivity$onCreate$1$1(continuation);
    }

    public final Object invoke(
	    CoroutineScope coroutineScope,
		Continuation<? super Unit> continuation
	) {
        return ((MainActivity$onCreate$1$1) create(coroutineScope, continuation))
		    .invokeSuspend(Unit.INSTANCE);
    }

    @Override // kotlin.coroutines.jvm.internal.BaseContinuationImpl
    public final Object invokeSuspend(Object obj) {
        IntrinsicsKt.getCOROUTINE_SUSPENDED();
        switch (this.label) {
            case 0:
                ResultKt.throwOnFailure(obj);
                System.out.println((Object) "Start");
                Thread.sleep(2000);
                System.out.println((Object) "End");
                return Unit.INSTANCE;
            default:
                throw new IllegalStateException("...");
        }
		// ↑↑ タスクブロック(asyncの引数に指定したラムダ式)を含む ↑↑
    }
}
以後、タスクブロックを格納したクラスを「Coroutineクラス」と呼ぶことにします。
Function2インターフェース
Function2はCoroutineクラスに実装されたインターフェースです。
public interface Function2<P1, P2, R> extends Function<R> {
    R invoke(P1 p1, P2 p2);
}
バイトコードでは、Coroutineクラスを引数で受け渡す際の型として、Function2が用いられます。
SuspendLambdaの継承
SuspendLambdaはCoroutineクラスに継承されたクラスです。Continuationインターフェースを実装しています。
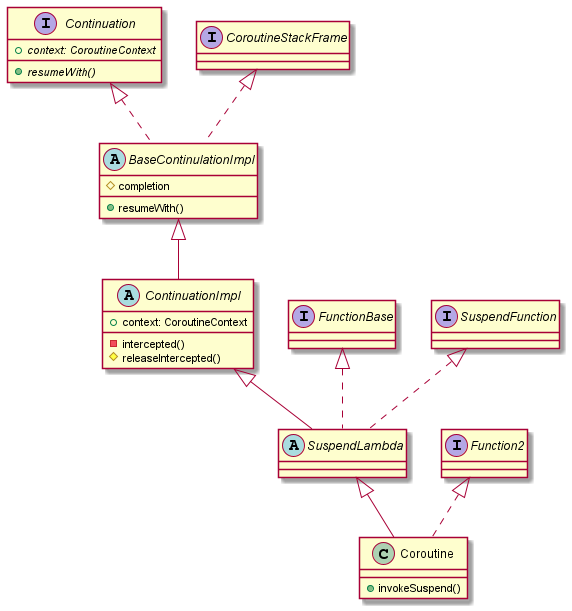
SuspendLambdaはタスクブロックの実行と終了を管理する役割があります。そのための仕組みをBaseContinuationImplが実装しています。
コールバックを受け取るクラス…(2)
DeferredCoroutineはContinuationインターフェースを実装したクラスです。
タスクブロックの処理を終えたスレッドからコールバックを受け取る役割があります。Continuation#resumeWith( )がコールバックされる関数です。
SuspendLambdaと同様に、Countinuationインターフェースを実装していながら、BaseContinuationImplの実装を持たない点が異なります。
コルーチンを開始するstart( )…(3)
DeferredCoroutineはAbstractCoroutine抽象クラスを継承しています。
そのAbstractCoroutine#start( )でコルーチンは開始されます。
public abstract class AbstractCoroutine<in T>(
    ...
	public fun <R> start(start: CoroutineStart, receiver: R, block: suspend R.() -> T) {
        initParentJob()
        start(block, receiver, this) // CoroutineStart#invoke( )関数を実行
    }
	...
}
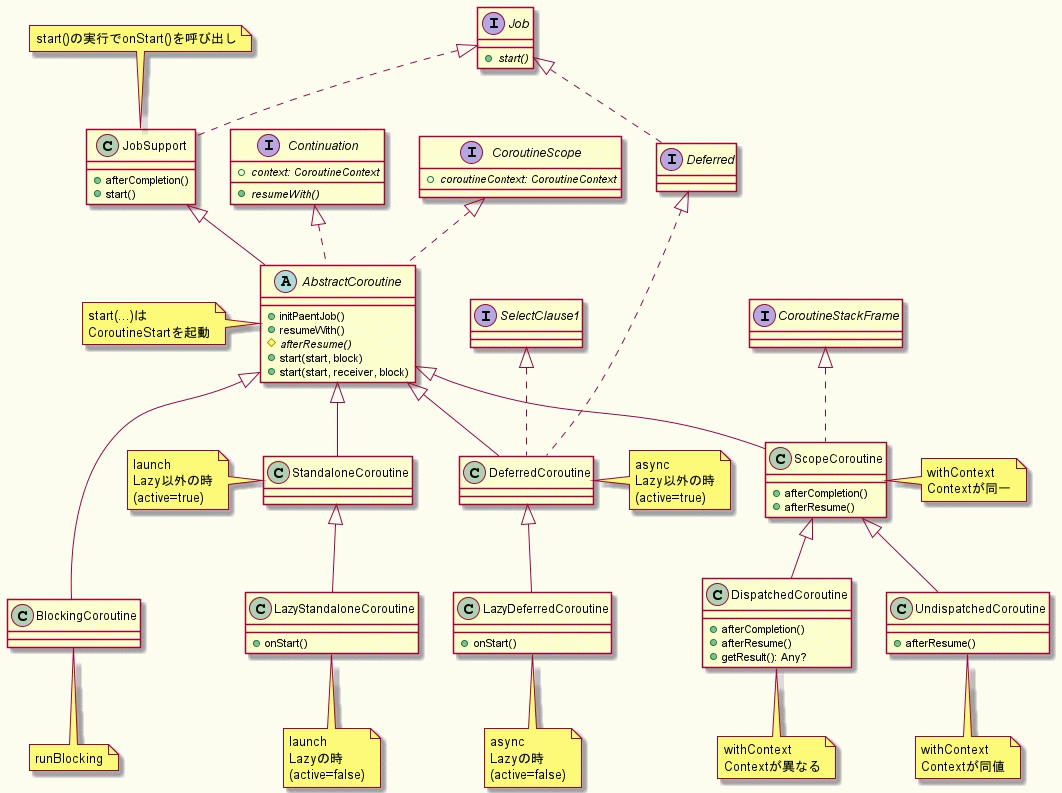
オプションで開始方法の切り替え
CoroutineStartはEnumクラスです。CoroutineStartのインスタンスstartをstart(…)のように実行することは、invoke(…)関数を実行することです。
public enum class CoroutineStart {
    DEFAULT,
    LAZY,
    ATOMIC,
    UNDISPATCHED;

    ...
    public operator fun <R, T> invoke(
	    block: suspend R.() -> T, receiver: R, completion: Continuation<T>
	): Unit =
        when (this) {
            DEFAULT -> block.startCoroutineCancellable(receiver, completion)
            ATOMIC -> block.startCoroutine(receiver, completion)
            UNDISPATCHED -> block.startCoroutineUndispatched(receiver, completion)
            LAZY -> Unit // will start lazily
        }
    ...
}
実行するinvoke( )内でCoroutineStart.XXX(スタートオプション)毎にコルーチンの開始方法を切り替えています。
※スタートオプションの詳細は「Coroutine:asyncビルダーでコルーチン開始」を参照
コルーチン準備&スレッド起動
CoroutineStart.DEFAULTの場合を例にとれば、コルーチンの開始で最後に実行されるのは次の構文になります。
...
internal fun <R, T> (suspend (R) -> T).startCoroutineCancellable(
    receiver: R, completion: Continuation<T>
) =
    runSafely(completion) {  // 最後の引数がラムダ式⇒( )の外へ出せる
        createCoroutineUnintercepted(receiver, completion)
		    .intercepted()
			.resumeCancellableWith(Result.success(Unit))
    }
...
private inline fun runSafely(completion: Continuation<*>, block: () -> Unit) {
    try {
        block()              // runSafelyは引数のラムダ式を実行する
    } catch (e: Throwable) {
        completion.resumeWith(Result.failure(e))
    }
}
前半の2つ(青背景)はコール―チン開始の準備です。
コールバックを受け取るクラスとDispatchers(スレッドプール)をCoroutineクラスへ登録しています。
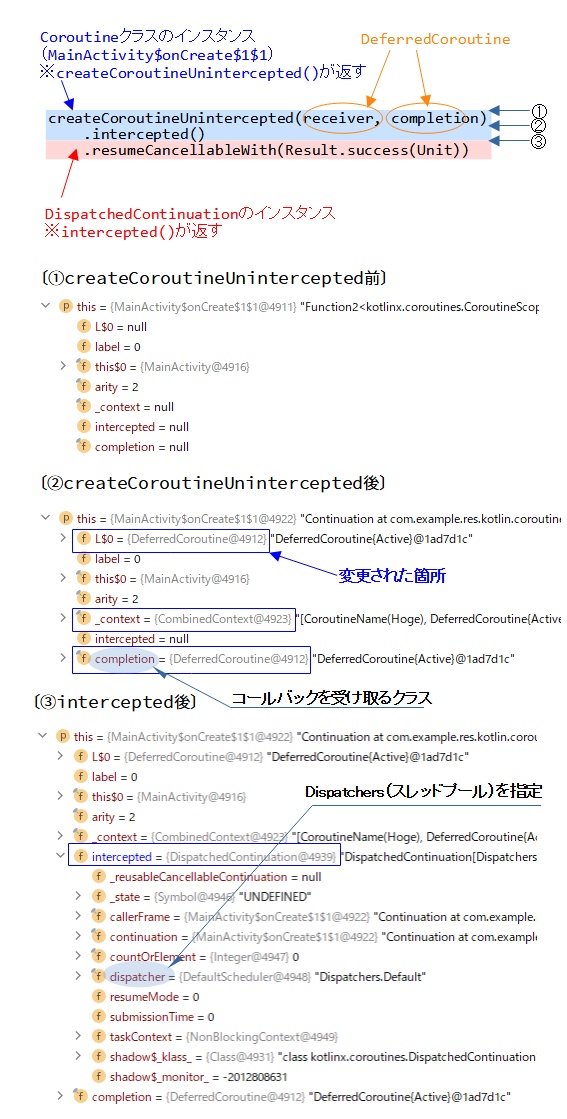
後半の1つ(赤背景)はスレッドの起動を行っています。
Dispatchersが持つdispatch( )関数(図ではDefaultScheduler#dispatch( ))が実行されると、スレッドが起動されます。
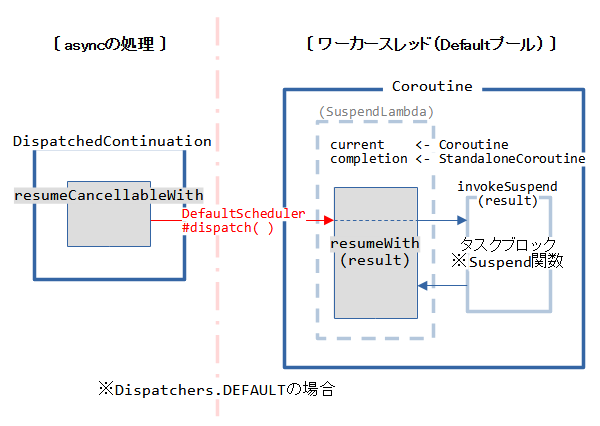
そのスレッドでCoroutineクラスのresumeWith( )が呼ばれ、タスクブロックの処理が始まります。
コルーチンの内部動作
次のようなasyncでコルーチンを開始した場合の動作を考えます。
        findViewById<Button>(R.id.btnStart).setOnClickListener {
            scope = SampleScope()
            scope?.async(Dispatchers.Default) {
                // --- State:0 ---
                println("Start top ${getThread()}")
                val _deferred = async(Dispatchers.Main) {
                    println("Start sub ${getThread()}")
                    Thread.sleep(1000)  // 重い処理の代わり
                    println("End sub")
                    "AAA"               // asyncの結果(ブロック中の最後の評価)
                }
                val _result = _deferred.await()
                // --- State:1 ---
                println("End top ${_result}");
            }
        }
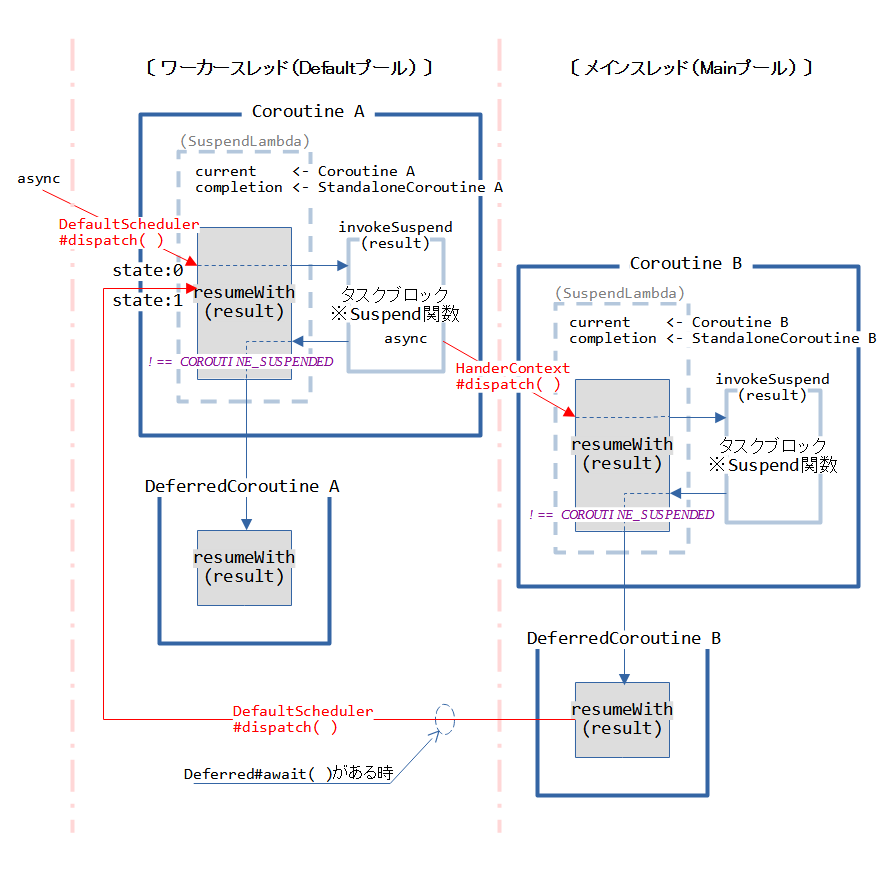
コルーチン開始後の内部動作はSuspendLambdaが継承しているBaseContinuationImpl#resumeWith( )が制御しています。
resumeWith( )の役割は次の2つです。
(1)タスクブロックの実行
(2)コールバックの発行
internal abstract class BaseContinuationImpl(
    public val completion: Continuation<Any?>?
) : Continuation<Any?>, CoroutineStackFrame, Serializable {

    public final override fun resumeWith(result: Result<Any?>) {
        var current = this
        var param = result
        while (true) {
            probeCoroutineResumed(current)
            with(current) {
                val completion = completion!!
                val outcome: Result<Any?> =
                    try {
                        val outcome = invokeSuspend(param) // タスクブロック処理
                        if (outcome === COROUTINE_SUSPENDED) return  // 同一?
                        Result.success(outcome)
                    } catch (exception: Throwable) {
                        Result.failure(exception)
                    }
                releaseIntercepted()
                if (completion is BaseContinuationImpl) { // 上位のSuspend関数へ
                    current = completion
                    param = outcome
                } else {                                  // コールバックを発行
                    completion.resumeWith(outcome)
                    return
                }
            }
        }
    }

	protected abstract fun invokeSuspend(result: Result<Any?>): Any?
	// ↑↑ Coroutineクラスで実装されている ↑↑ //
    ...
}
タスクブロックの実行…(1)
asyncのタスクブロックはSuspend関数です。よって、内部にSuspend関数を持つ(階層構造)時、ステートマシンの構成を取ります。
「=== COROUTINE_SUSPENDED」の間はresumeWith( )とinvokeSuspend( )の間をループして、ステートマシンの処理を進めます。
※詳細は「Coroutine:Suspend関数とその仕組み」を参照
コールバックの発行…(2)
「!== COROUTINE_SUSPENDED」はタスクブロックの実行が終わって、結果が得られたことを表します。
completionプロパティはコールバックを受け取るクラス(DeferredCoroutine)が入っています。このクラスはBaseContinuationImplを継承していないため、completion.resumeWith( )を実行します。
つまり、DeferredCoroutine#resumeWith( )を実行することになります。
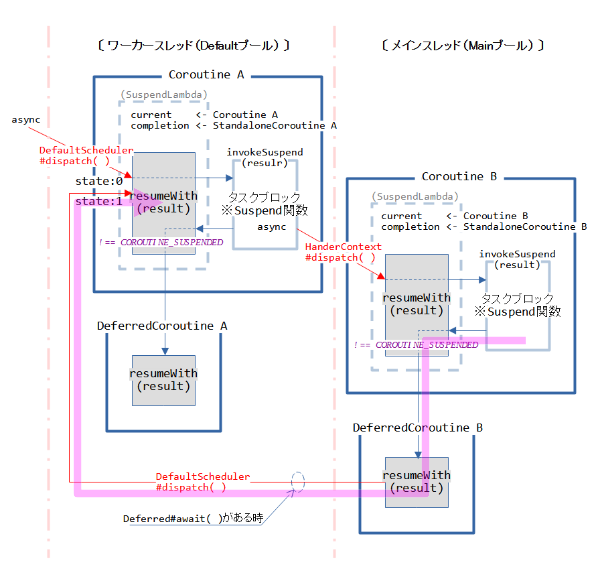
上位へコールバックの発行
Deferred#await( )が実行されている場合は、コールバックを受け取るクラス(DeferredCoroutine)から上位のコルーチンへ、更にコールバックを返します。
このとき、スレッドを跨ぎます。
上位CoroutineクラスのDispatchersが持つdispatch( )関数により、スレッドが起動します。
スレッドが実行するのは上位CoroutineクラスのresumeWith( )関数です。
コルーチンの結果取得
asyncはコルーチンの結果としてタスクブロックの戻り値を取得できます。
Deferred#await( )の実態
結果の取得はDeferred#await( )関数を使います。
asyncは実行時にDeferredCoroutineのインスタンスを返します。そして、await( )はDeferredCoroutineに実装されたDeferredインターフェースが持つ関数です。
private open class DeferredCoroutine<T>(
    parentContext: CoroutineContext,
    active: Boolean
) : AbstractCoroutine<T>(parentContext, active), Deferred<T>, SelectClause1<T> {
    override fun getCompleted(): T = getCompletedInternal() as T
    override suspend fun await(): T = awaitInternal() as T
    override val onAwait: SelectClause1<T> get() = this
    override fun <R> registerSelectClause1(select: SelectInstance<R>, block: suspend (T) -> R) =
        registerSelectClause1Internal(select, block)
}
public interface Deferred<out T> : Job {
    public suspend fun await(): T
    public val onAwait: SelectClause1<T>
    public fun getCompleted(): T
    public fun getCompletionExceptionOrNull(): Throwable?
}
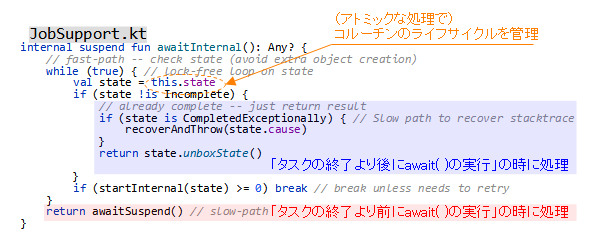
その実態はJobSupport#awaitInternal( )になります。
    internal suspend fun awaitInternal(): Any? {
        // fast-path -- check state (avoid extra object creation)
        while (true) { // lock-free loop on state
            val state = this.state
            if (state !is Incomplete) {
                // already complete -- just return result
                if (state is CompletedExceptionally) { // Slow path to recover stacktrace
                    recoverAndThrow(state.cause)
                }
                return state.unboxState()

            }
            if (startInternal(state) >= 0) break // break unless needs to retry
        }
        return awaitSuspend() // slow-path
    }
結果の取得タイミングは2つ
結果の取得タイミングは「await( )の実行」と「タスクの終了」の時間的な前後関係で2つのケースありあます。
「await( )の実行」と「タスクの終了」は別のスレッドで処理されるので非同期です。
よって、両者のタイミングが近接しているとレーシング(競争、どちらが先になるか不明)状態になります。
ですが、await( )は(1)と(2)のどちらのケースでも問題が出ないように、アトミックな処理を行っているようです。
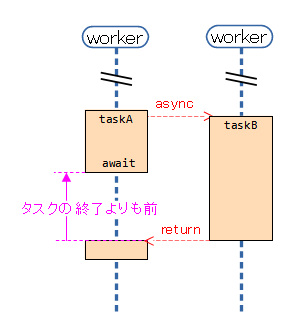
タスクの終了より前にawait( )の実行
asyncによって開始されたコルーチンは開始から終了までのライフサイクルを持ちます。
JobSupport#stateにライフサイクルの状態を保持しています。
このstateを確認し、await( )の実行がタスクの終了よりも前であればawaitSuspend( )を実行(赤背景)します。
awaitSuspend( )はCOROUTINE_SUSPENDEDを返すので、スレッドは一時停止(non-blocking動作)します。
ここでDeferred#await( )は戻り値の取得を行いません。
結果はresumeWith(result)の引数に載せられて、Coroutineクラスへ送られます。
以下の例は、その様子を示したものです。
結果保持の変数は、結果取得数に合わせてKotlinコンパイラが自動生成します。

final class MainActivity$onCreate$1$1
    extends SuspendLambda
	implements Function2<CoroutineScope, Continuation<? super Unit>, Object>
{
    Object L$0;		// 結果保持の変数
    Object L$1;		// 結果保持の変数
    Object L$2;		// 結果保持の変数
    int label;
    final MainActivity this$0;
    ...

	public final Object invokeSuspend(Object $result) {  // 下位階層からの結果
        ...
	}

	...
}
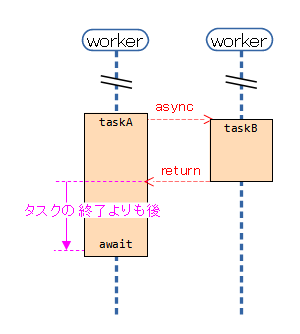
タスクの終了より後にawait( )の実行
asyncによって開始されたコルーチンは開始から終了までのライフサイクルを持ちます。
JobSupport#stateにライフサイクルの状態を保持しています。
このstateを確認し、await( )の実行がタスクの終了よりも後であれば if文内を実行(青背景)します。
stateは内部にコルーチンの結果を格納しています。
取り出してawait( )の戻り値にします。
関連記事: