
CoroutineContextはコルーチンで起動されるスレッドの属性を格納しています。
その中にコルーチンの名前を表現するName属性があります。
Name属性を出力する方法を紹介します。
目次
スポンサーリンク
CoroutineContextのName属性
CoroutineContextは次のような属性を格納しています。
| 属性名 | Key | 概要 |
|---|---|---|
| Job | Job | 自身が管理しているスレッドのハンドラー |
| Dispatchers | ContinuationInterceptor | スレッドの取得先(スレッドプール名) |
| Name | CoroutineName | コルーチンの名前(デバッグ用) |
| ExceptionHandler | CoroutineExceptionHandler | 例外通知のハンドラー |
| ※スレッドのハンドラー:スレッドに対して指示を出す場合の窓口 | ||
この中のName属性はコルーチンへ付けられた名前を表現します。
用途はデバッグでコルーチンを識別するためです。ただし、デフォルトは出力されません。
スポンサーリンク
Name属性を設定
Name属性を設定する方法は幾つかあります。
CoroutineScopeの実装時
CoroutineScopeを実装する時に設定します。
public interface CoroutineScope {
    public val coroutineContext: CoroutineContext
}
class SampleScope : CoroutineScope {
    override val coroutineContext: CoroutineContext =
        Job() + Dispatchers.Default + CoroutineName("Hoge") // Contextを定義
}
ビルダーまたはwithContextの引数
ビルダーまたはwithContextの引数で設定します。
            scope = SampleScope()
            scope?.launch {
                launch(CoroutineName("Fuga")) { ... }
                async(CoroutineName("Pico")) { ... }.await()
                withContext(CoroutineName("KoKo")) { ... }
            }
スポンサーリンク
Name属性の出力
currentThread( )関数を使ってスレッド名を取得しても、デフォルトはコルーチン名を出力しません。
//        System.setProperty("kotlinx.coroutines.debug", "on" )

        findViewById<Button>(R.id.btnStart).setOnClickListener {
            scope = SampleScope()
            scope?.launch(Dispatchers.Default) {
                println("Start[DEFAULT] Thread = ${getThread()}")
                Thread.sleep(1000)     // 重い処理の代わり
            }
            scope?.async(Dispatchers.Main) {
                println("Start[NAIN]    Thread = ${getThread()}")
                Thread.sleep(1000)     // 重い処理の代わり
            }
            scope?.launch {
                withContext(Dispatchers.IO) {
                    println("Start[IO]      Thread = ${getThread()}")
                }
                Thread.sleep(1000)     // 重い処理の代わり
            }
        }
    inline private fun getThread(): String {
        return Thread.currentThread().name  // カレントのスレッド名
    }
Start[NAIN]    Thread = main
Start[IO]      Thread = DefaultDispatcher-worker-1
Start[DEFAULT] Thread = DefaultDispatcher-worker-2
コルーチン名はdebugスイッチをonに切り替えることにより出力されます。
        System.setProperty("kotlinx.coroutines.debug", "on" )

        findViewById<Button>(R.id.btnStart).setOnClickListener {
            scope = SampleScope()
            scope?.launch(Dispatchers.Default) {
                println("Start[DEFAULT] Thread = ${getThread()}")
                Thread.sleep(1000)     // 重い処理の代わり
            }
            scope?.async(Dispatchers.Main) {
                println("Start[NAIN]    Thread = ${getThread()}")
                Thread.sleep(1000)     // 重い処理の代わり
            }
            scope?.launch {
                withContext(Dispatchers.IO) {
                    println("Start[IO]      Thread = ${getThread()}")
                }
                Thread.sleep(1000)     // 重い処理の代わり
            }
        }
Start[DEFAULT] Thread = DefaultDispatcher-worker-1 @Hoge#1
Start[NAIN]    Thread = main @Hoge#2
Start[IO]      Thread = DefaultDispatcher-worker-2 @Hoge#3
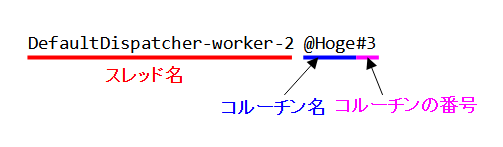
サンプルは全て同じCoroutineScope(例はSampleScope)を起点にコルーチンを開始しているので、同じコルーチン名(例は”Hoge”)になっています。
スポンサーリンク
コルーチンの番号
コルーチンの番号は、コルーチンが開始される毎に付けられる通し番号です。
Dispatchersと無関係
コルーチンの番号はDispatchers(スレッドの取得先)と無関係です。通し番号になります。
        System.setProperty("kotlinx.coroutines.debug", "on" )

        findViewById<Button>(R.id.btnStart).setOnClickListener {
            scope = SampleScope()
            scope?.launch(Dispatchers.Default) {
                println("Start[DEFAULT] Thread = ${getThread()}")
                Thread.sleep(1000)     // 重い処理の代わり
            }
            scope?.async(Dispatchers.Main) {
                println("Start[NAIN]    Thread = ${getThread()}")
                Thread.sleep(1000)     // 重い処理の代わり
            }
        }
Start[DEFAULT] Thread = DefaultDispatcher-worker-1 @Hoge#1
Start[DEFAULT] Thread = DefaultDispatcher-worker-2 @Hoge#3
Start[NAIN]    Thread = main @Hoge#2
Start[NAIN]    Thread = main @Hoge#4
コルーチンの親子関係と無関係
コルーチンの番号は入れ子になった場合の親子関係に無関係です。通し番号になります。
        System.setProperty("kotlinx.coroutines.debug", "on" )

		findViewById<Button>(R.id.btnStart).setOnClickListener {
            scope = SampleScope()
            scope?.launch {
                println("Star[parent] Thread = ${getThread()}")
                launch {
                    println("  Star[child:0] Thread = ${getThread()}")
                    launch {
                        println("    Star[child:1] Thread = ${getThread()}")
                        Thread.sleep(1000)     // 重い処理の代わり
                    }
                    Thread.sleep(1000)     // 重い処理の代わり
                }
                Thread.sleep(1000)     // 重い処理の代わり
            }
        }
Star[parent] Thread = DefaultDispatcher-worker-1 @Hoge#1
  Star[child:0] Thread = DefaultDispatcher-worker-2 @Hoge#2
    Star[child:1] Thread = DefaultDispatcher-worker-3 @Hoge#3
non-blocking動作時は同じ番号
Suspend関数でスレッドが一時停止したあと再開する場合、スレッドは再取得されます。しかし、新たなコルーチンが開始されるわけではありません。コルーチンの番号は同じ番号になります。
        System.setProperty("kotlinx.coroutines.debug", "on" )

        findViewById<Button>(R.id.btnStart).setOnClickListener {
            scope = SampleScope()
            scope?.launch {
                println("Star[State:0] Thread = ${getThread()}")
                delay(1000)  // スレッドの一時停止
                println("Star[State:1] Thread = ${getThread()}")
                delay(1000)  // スレッドの一時停止
                println("Star[State:2] Thread = ${getThread()}")
            }
        }
Star[State:0] Thread = DefaultDispatcher-worker-2 @Hoge#1
Star[State:1] Thread = DefaultDispatcher-worker-2 @Hoge#1
Star[State:2] Thread = DefaultDispatcher-worker-2 @Hoge#1
withContextのケースは同じ番号
withContextはasync(+await)と同様な動作です。しかし、コルーチンが開始されるわけではありません。コルーチンの番号は同じ番号になります。
        System.setProperty("kotlinx.coroutines.debug", "on" )

        findViewById<Button>(R.id.btnStart).setOnClickListener {
            scope = SampleScope()
            scope?.launch {
                withContext(Dispatchers.Default) {
                    println("Star[withContext:0] Thread = ${getThread()}")
                    Thread.sleep(1000)     // 重い処理の代わり
                }
                withContext(Dispatchers.Main) {
                    println("Star[withContext:1] Thread = ${getThread()}")
                    Thread.sleep(1000)     // 重い処理の代わり
                }
                withContext(Dispatchers.IO) {
                    println("Star[withContext:2] Thread = ${getThread()}")
                    Thread.sleep(1000)     // 重い処理の代わり
                }
            }
        }
Star[withContext:0] Thread = DefaultDispatcher-worker-2 @Hoge#1
Star[withContext:1] Thread = main @Hoge#1
Star[withContext:2] Thread = DefaultDispatcher-worker-2 @Hoge#1
スポンサーリンク
関連記事:
近頃の携帯端末はクワッドコア(プロセッサが4つ)やオクタコア(プロセッサが8つ)が当たり前になりました。 サクサク動作するアプリを作るために、この恩恵を使わなければ損です。 となると、必然的に非同期処理(マルチスレッド)を使うことになります。 JavaのThreadクラス、Android APIのAsyncTaskクラスが代表的な手法です。 Kotlinは上記に加えて「コルーチン(Coroutine)」が使えるようになっています。 今回は、このコルーチンについて、まとめます。 ...
コルーチン(Coroutine)は「非同期処理の手法」の1つです。 Kotlinが提供します。 特徴としてnon-blocking動作をサポートします。 このnon-blocking動作についてまとめます。 ...
コルーチン(Coroutine)は「非同期処理の手法」の1つです。 Kotlinが提供します。 コルーチンの構成要素であるSuspend関数について、まとめます。 ...
コルーチン(Coroutine)は「非同期処理の手法」の1つです。 Kotlinが提供します。 コルーチンはビルダー(Builder)により開始されます。 ビルダーは3つの種類があり、その中の1つがlaunchです。 このlaunchビルダーについて、まとめます。 ...
コルーチン(Coroutine)は「非同期処理の手法」の1つです。 Kotlinが提供します。 コルーチンを開始するlaunchビルダーの仕組みについて、まとめます。 ※仕組みの解析は次のバージョンを対象に行っています。 Kotlin:Ver 1.6.10 org.jetbrains.kotlinx:kotlinx-coroutines-android:1.3.9 ...
コルーチン(Coroutine)は「非同期処理の手法」の1つです。 Kotlinが提供します。 コルーチンはビルダー(Builder)により開始されます。 ビルダーは3つの種類があり、その中の1つがasyncです。 このasyncビルダーについて、まとめます。 ...
コルーチン(Coroutine)は「非同期処理の手法」の1つです。 Kotlinが提供します。 コルーチンを開始するasyncビルダーの仕組みについて、まとめます。 ※仕組みの解析は次のバージョンを対象に行っています。 Kotlin:Ver 1.6.10 org.jetbrains.kotlinx:kotlinx-coroutines-android:1.3.9 ...
コルーチン(Coroutine)は「非同期処理の手法」の1つです。 Kotlinが提供します。 コルーチンはビルダー(Builder)により開始されます。 ビルダーは3つの種類があり、その中の1つがrunBlockingです。 このrunBlockingビルダーについて、まとめます。 ...
コルーチン(Coroutine)は「非同期処理プログラミングの手法」の1つです。 Kotlinが提供します。 withContextはCoroutineContextを切り替えてスレッドを起動するSuspend関数です。 このwithContextについて、まとめます。 ...
コルーチン間でメッセージ(データ)の送受信を行うことが出来ます。 ここで紹介する「メッセージの送受信」を使えば、非同期処理の間で確実にデータを受け渡し出来ます。 それにより、非同期処理の連携が容易になります。 今回は、メッセージの送受信についての基礎と、Channelを使った最も基本的な送受信の動作をまとめます。 ※環境:Android Studio Flamingo | 2022.2.1 :org.jetbrains.kotlinx:kotlinx-coroutines-android:1.6.4 ...
KotlinのコルーチンAPIは「コルーチン間でメッセージを送受信する仕組み」を提供しています。 Channel、Produce、Flow、SharedFlow、StateFlowなどです。 これらは、「メッセージを送受信する」という本命の動作は変わりませんが、特徴や違いを持ちます。 プログラミングで利用する際は、特徴や違いを理解して、使い分けが必要になります。 ですので、各々を比較しつつ、まとめました。 この記事は「Produce」について、まとめたものです。 ※環境:Android Studio Koala Feature Drop | 2024.1.2 Kotlin 1.9.0 Compose Compiler 1.5.1 org.jetbrains.kotlinx:kotlinx-coroutines-android 1.7.3 org.jetbrains.kotlinx:kotlinx-coroutines-core 1.7.3 ...
KotlinのコルーチンAPIは「コルーチン間でメッセージを送受信する仕組み」を提供しています。 Channel、Produce、Flow、SharedFlow、StateFlowなどです。 これらは、「メッセージを送受信する」という本命の動作は変わりませんが、特徴や違いを持ちます。 プログラミングで利用する際は、特徴や違いを理解して、使い分けが必要になります。 ですので、各々を比較しつつ、まとめました。 この記事は「Flow」について、まとめたものです。 ※環境:Android Studio Koala Feature Drop | 2024.1.2 Kotlin 1.9.0 Compose Compiler 1.5.1 org.jetbrains.kotlinx:kotlinx-coroutines-android 1.7.3 org.jetbrains.kotlinx:kotlinx-coroutines-core 1.7.3 ...
KotlinのコルーチンAPIは「コルーチン間でメッセージを送受信する仕組み」を提供しています。 Channel、Produce、Flow、SharedFlow、StateFlowなどです。 これらは、「メッセージを送受信する」という本命の動作は変わりませんが、特徴や違いを持ちます。 プログラミングで利用する際は、特徴や違いを理解して、使い分けが必要になります。 ですので、各々を比較しつつ、まとめました。 この記事は「SharedFlow」について、まとめたものです。 ※環境:Android Studio Koala Feature Drop | 2024.1.2 Kotlin 1.9.0 Compose Compiler 1.5.1 org.jetbrains.kotlinx:kotlinx-coroutines-android 1.7.3 org.jetbrains.kotlinx:kotlinx-coroutines-core 1.7.3 ...
KotlinのコルーチンAPIは「コルーチン間でメッセージを送受信する仕組み」を提供しています。 Channel、Produce、Flow、SharedFlow、StateFlowなどです。 これらは、「メッセージを送受信する」という本命の動作は変わりませんが、特徴や違いを持ちます。 プログラミングで利用する際は、特徴や違いを理解して、使い分けが必要になります。 ですので、各々を比較しつつ、まとめました。 この記事は「StateFlow」について、まとめたものです。 ※環境:Android Studio Koala Feature Drop | 2024.1.2 Kotlin 1.9.0 Compose Compiler 1.5.1 org.jetbrains.kotlinx:kotlinx-coroutines-android 1.7.3 org.jetbrains.kotlinx:kotlinx-coroutines-core 1.7.3 ...
Flowはメンバー関数や拡張関数で様々な機能を提供しています。 これらの関数は大きく分けて、中間演算(Intermediate operators)と終端演算(Terminal operators)に分けられます。 中間演算とは、withIndex、map、filter、drop、take、zip、merge、combineなどです。通信経路(Flow)の途中に位置して、ストリームデータを変更したり、Flowを統合したりします。 終端演算とは、collect、single、reduce、toListなどです。通信経路の末端に位置して、ストリームデータを収集します。 今回は、この「Flowの中間演算」のwithIndex、map、filter、drop、takeを取り上げて、まとめます。 ※環境:Android Studio Koala Feature Drop | 2024.1.2 Patch 1 Kotlin 1.9.0 Compose Compiler 1.5.1 org.jetbrains.kotlinx:kotlinx-coroutines-androi ...
Flowはメンバー関数や拡張関数で様々な機能を提供しています。 これらの関数は大きく分けて、中間演算(Intermediate operators)と終端演算(Terminal operators)に分けられます。 中間演算とは、withIndex、map、filter、drop、take、zip、merge、combineなどです。通信経路(Flow)の途中に位置して、ストリームデータを変更したり、Flowを統合したりします。 終端演算とは、collect、single、reduce、toListなどです。通信経路の末端に位置して、ストリームデータを収集します。 今回は、この「Flowの中間演算」のzip、merge、combineを取り上げて、まとめます。 ※環境:Android Studio Koala Feature Drop | 2024.1.2 Patch 1 Kotlin 1.9.0 Compose Compiler 1.5.1 org.jetbrains.kotlinx:kotlinx-coroutines-android 1.7.3 o ...
スポンサーリンク